Using the Business Manager module, setting up custom vanity domains and uploading certificates on the production instance is easy. But how about staging?
Until recently, we needed to contact support to set up custom vanity domains with a valid certificate on the staging instances. Luckily that has changed, and now we can fully control the domains and certificates for staging “just like production”.
Yes, it has been put between quotes. Let us find out why!
API First
In an API-first manner, REST APIs are available to manage the eCDN (Cloudflare) for all our environments. But unlike production, there is yet to be a Business Manager module available to do this on staging.
Step 1: Create an API Client
To connect to the SCAPI, we need to create an API client with the correct scopes:
- sfcc.cdn-zones
- sfcc.cdn-zones.rw
Salesforce has written a guide on the developer support site to create an API Client for this use case.
e.g.zzxx_001
Step 2: Get the staging credentials
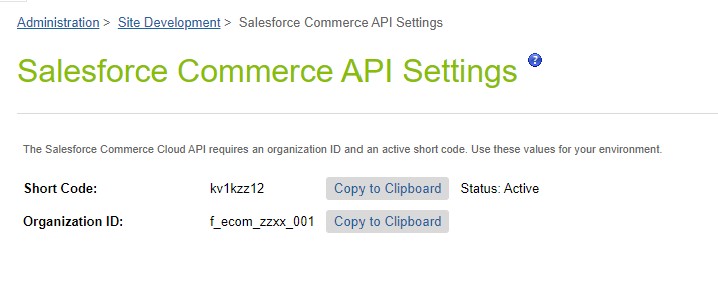
Since the “CDN Zones” API is part of the SCAPI, we need to get our environment-specific credentials from the business manager. In this case, that is our Staging instance.
We get these settings here:
“Administration > Site Development > Salesforce Commerce API Settings”
Step 3: Get an access token
To communicate with the Zones API, we need a bearer token. This is fetched using the following API call to the Account Manager
					curl -i -k \
--data 'grant_type=client_credentials&scope=SALESFORCE_COMMERCE_API:<tenantID> sfcc.cdn-zones sfcc.cdn-zones.rw' \
--user '<client-id>:<client-secret>' \
-X POST 'https://account.demandware.com/dwsso/oauth2/access_token'
If all goes well, a response similar to the one below appears.
					{
    "access_token": "eyJ0eXAiOiJKV1QiLCJraWQiOiJEMWhPUDdEODN4TjBqZWlqaTI3WWFvZFRjL0E9IiwiYWxnIjoiUlMyNTYifQ.eyJzdWIiOiIxZDc2MzI2MS02NTIyLTQ5MTMtOWQ1Mi01ZDk0N2QzYjk0YzQiLCJjdHMiOiJPQVVUSDJfU1RBVEVMRVNTX0dSQU5UIiwiYXVkaXRUcmFja2luZ0lkIjoiZDBkZDk4MjItMmI3ZC00MThiLTkzZTktYzg2YjgxYjZjZGFhLTE2OTY2NTI3MSIsInN1Ym5hbWUiOiIxZDc2MzI2MS02NTIyLTQ5MTMtOWQ1Mi01ZDk0N2QzYjk0YzQiLCJpc3MiOiJodHRwczovL2FjY291bnQuZGVtYW5kd2FyZS5jb206NDQzL2R3c3NvL29hdXRoMiIsInRva2VuTmFtZSI6ImFjY2Vzc190b2tlbiIsInRva2VuX3R5cGUiOiJCZWFyZXIiLCJhdXRoR3JhbnRJZCI6IjcyWTZ0Slk1bm9vdEhMX2YzLWN5SzZrajVsOCIsImF1ZCI6IjFkNzYzMjYxLTY1MjItNDkxMy05ZDUyLTVkOTQ3ZDNiOTRjNCIsIm5iZiI6MTY1MTYyMjUzOCwiZ3JhbnRfdHlwZSI6ImNsaWVudF9jcmVkZW50aWFscyIsInNjb3BlIjpbIlNBTEVTRk9SQ0VfQ09NTUVSQ0VfQVBJOnp6dGVfMDUzIiwic2ZjYy5jYXRhbG9ncyIsIm1haWwiLCJ0ZW5hbnRGaWx0ZXIiLCJvcGVuSWQiLCJyb2xlcyJdLCJhdXRoX3RpbWUiOjE2NTE2MjI1MzgsInJlYWxtIjoiLyIsImV4cCI6MTY1MTYyNDMzOCwiaWF0IjoxNjUxNjIyNTM4LCJleHBpcmVzX2luIjoxODAwLCJqdGkiOiJlaXdlanNyWmxRdEpmMXhPZ0lJaVQ3REo2LTgiLCJjbGllbnRfaWQiOiIxZDc2MzI2MS02NTIyLTQ5MTMtOWQ1Mi01ZDk0N2QzYjk0YzQiLCJ0ZW5hbnRGaWx0ZXIiOiJTQUxFU0ZPUkNFX0NPTU1FUkNFX0FQSTp6enRlXzA1MyIsInJvbGVzIjpbIlNBTEVTRk9SQ0VfQ09NTUVSQ0VfQVBJIl19.N_D2gZuJfQcIo-X42O4i-hz1j4_KxYzaqYb4CqVSf96Zt9w5-WmDPP_swuIz2eCivxwrs0hyfKmDTS7mQG_fLXiuAr6FT0bMVYndfmSbngJl24eCXu2U6b5-cMlUmwAG7mO7Uji4_cXtayUCA9XGUSVXxu1HuiFzANws_D-cCWlgoaWpEvPmkhq3o_ICJvhcqaZTYDaoQ62hDToMqdojbRQFe6s2kDLiqOIi6Ey_VYev8bRTu4RtXmJ6Pfj_xp0mgc4ak8zaxCVcykZ-ziEE9TqO-tN1U6n0QnuTh-t3wz2iSyEcfJ3fOtv9v9zz1BYpe1qMCYDTkKnMq_alERtKZg",
    "scope": "SALESFORCE_COMMERCE_API:zzxx_001 sfcc.cdn-zones sfcc.cdn-zones.rw",
    "token_type": "Bearer",
    "expires_in": 1799
}
Step 4: Get all zones
First, check that we can use our newly fetched “access_token” to call the Zones API. This information can be obtained by making a GET call to the “Get zones info” endpoint.
https://{shortCode}.api.commercecloud.salesforce.com/cdn/zones/v1/organizations/{organizationId}/zones/info
If all the steps have been adhered to above, a response like the one below will magically appear!
					[{
  "zoneId": "example1-zone-Id",
  "name": "example1.com",
  "status": "pending"
}]
Step 5: Create a zone (register domain)
Now that it is confirmed that API calls can be made, the first step in creating a custom domain for the Staging environment can be done: “Creating a zone in Cloudflare”.
To achieve this, the following API call must be made to the “Create storefront zone” endpoint:
e.g. To use "stg.cc-merchant.com", "cc-merchant.com" is submitted in the request of this step.
					curl "https://{shortCode}.api.commercecloud.salesforce.com/cdn/zones/v1/organizations/{organizationId}/storefront-zones" \
  -X POST \
  -d "{\n  \"domainName\": \"cc-merchant.com\"\n}"
If the zone did not exist already and is created successfully, the following response is given:
					{
  "data": {
    "zoneId": "023e105f4ecef8ad9ca31a8372d0c353",
    "zoneName": "stg-zzzz-cc-merchant-com.cc-ecdn.net",
    "createdOn": "2022-01-01T05:20:00.12345Z",
    "status": "active"
  }
}
Step 6: Upload the certificate
Finally, we get to the “goal”: Uploading the certificate. To do that, an API call is made to the “Add certificate for zone” endpoint.
https://{shortCode}.api.commercecloud.salesforce.com/cdn/zones/v1/organizations/{organizationId}/zones/{zoneId}/certificates
This is a POST call with the following body:
					{
  "hostname": "cc-merchant.com",
  "certificate": "-----BEGIN CERTIFICATE-----\\nMIIDtTCCAp2gAwIBAgIJAMHAwfXZ5/PWMA0GCSqGSIb3DQEBCwUAMEUxCzAJBgNV\\nBAYTAkFVMRMwEQYDVQQIEwpTb21lLVN0YXRlMSEwHwYDVQQKExhJbnRlcm5ldCBX\\naWRnaXRzIFB0eSBMdGQwHhcNMTYwODI0MTY0MzAxWhcNMTYxMTIyMTY0MzAxWjBF\\nMQswCQYDVQQGEwJBVTETMBEGA1UECBMKU29tZS1TdGF0ZTEhMB8GA1UEChMYSW50\\nZXJuZXQgV2lkZ2l0cyBQdHkgTHRkMIIBIjANBgkqhkiG9w0BAQEFAAOCAQ8AMIIB\\nCgKCAQEAwQHoetcl9+5ikGzV6cMzWtWPJHqXT3wpbEkRU9Yz7lgvddmGdtcGbg/1\\nCGZu0jJGkMoppoUo4c3dts3iwqRYmBikUP77wwY2QGmDZw2FvkJCJlKnabIRuGvB\\nKwzESIXgKk2016aTP6/dAjEHyo6SeoK8lkIySUvK0fyOVlsiEsCmOpidtnKX/a+5\\n0GjB79CJH4ER2lLVZnhePFR/zUOyPxZQQ4naHf7yu/b5jhO0f8fwt+pyFxIXjbEI\\ndZliWRkRMtzrHOJIhrmJ2A1J7iOrirbbwillwjjNVUWPf3IJ3M12S9pEewooaeO2\\nizNTERcG9HzAacbVRn2Y2SWIyT/18QIDAQABo4GnMIGkMB0GA1UdDgQWBBT/LbE4\\n9rWf288N6sJA5BRb6FJIGDB1BgNVHSMEbjBsgBT/LbE49rWf288N6sJA5BRb6FJI\\nGKFJpEcwRTELMAkGA1UEBhMCQVUxEzARBgNVBAgTClNvbWUtU3RhdGUxITAfBgNV\\nBAoTGEludGVybmV0IFdpZGdpdHMgUHR5IEx0ZIIJAMHAwfXZ5/PWMAwGA1UdEwQF\\nMAMBAf8wDQYJKoZIhvcNAQELBQADggEBAHHFwl0tH0quUYZYO0dZYt4R7SJ0pCm2\\n2satiyzHl4OnXcHDpekAo7/a09c6Lz6AU83cKy/+x3/djYHXWba7HpEu0dR3ugQP\\nMlr4zrhd9xKZ0KZKiYmtJH+ak4OM4L3FbT0owUZPyjLSlhMtJVcoRp5CJsjAMBUG\\nSvD8RX+T01wzox/Qb+lnnNnOlaWpqu8eoOenybxKp1a9ULzIVvN/LAcc+14vioFq\\n2swRWtmocBAs8QR9n4uvbpiYvS8eYueDCWMM4fvFfBhaDZ3N9IbtySh3SpFdQDhw\\nYbjM2rxXiyLGxB4Bol7QTv4zHif7Zt89FReT/NBy4rzaskDJY5L6xmY=\\n-----END CERTIFICATE-----\\n",
  "privateKey": "-----BEGIN RSA PRIVATE KEY-----\\nMIIEowIBAAKCAQEAwQHoetcl9+5ikGzV6cMzWtWPJHqXT3wpbEkRU9Yz7lgvddmG\\ndtcGbg/1CGZu0jJGkMoppoUo4c3dts3iwqRYmBikUP77wwY2QGmDZw2FvkJCJlKn\\nabIRuGvBKwzESIXgKk2016aTP6/dAjEHyo6SeoK8lkIySUvK0fyOVlsiEsCmOpid\\ntnKX/a+50GjB79CJH4ER2lLVZnhePFR/zUOyPxZQQ4naHf7yu/b5jhO0f8fwt+py\\nFxIXjbEIdZliWRkRMtzrHOJIhrmJ2A1J7iOrirbbwillwjjNVUWPf3IJ3M12S9pE\\newooaeO2izNTERcG9HzAacbVRn2Y2SWIyT/18QIDAQABAoIBACbhTYXBZYKmYPCb\\nHBR1IBlCQA2nLGf0qRuJNJZg5iEzXows/6tc8YymZkQE7nolapWsQ+upk2y5Xdp/\\naxiuprIs9JzkYK8Ox0r+dlwCG1kSW+UAbX0bQ/qUqlsTvU6muVuMP8vZYHxJ3wmb\\n+ufRBKztPTQ/rYWaYQcgC0RWI20HTFBMxlTAyNxYNWzX7RKFkGVVyB9RsAtmcc8g\\n+j4OdosbfNoJPS0HeIfNpAznDfHKdxDk2Yc1tV6RHBrC1ynyLE9+TaflIAdo2MVv\\nKLMLq51GqYKtgJFIlBRPQqKoyXdz3fGvXrTkf/WY9QNq0J1Vk5ERePZ54mN8iZB7\\n9lwy/AkCgYEA6FXzosxswaJ2wQLeoYc7ceaweX/SwTvxHgXzRyJIIT0eJWgx13Wo\\n/WA3Iziimsjf6qE+SI/8laxPp2A86VMaIt3Z3mJN/CqSVGw8LK2AQst+OwdPyDMu\\niacE8lj/IFGC8mwNUAb9CzGU3JpU4PxxGFjS/eMtGeRXCWkK4NE+G08CgYEA1Kp9\\nN2JrVlqUz+gAX+LPmE9OEMAS9WQSQsfCHGogIFDGGcNf7+uwBM7GAaSJIP01zcoe\\nVAgWdzXCv3FLhsaZoJ6RyLOLay5phbu1iaTr4UNYm5WtYTzMzqh8l1+MFFDl9xDB\\nvULuCIIrglM5MeS/qnSg1uMoH2oVPj9TVst/ir8CgYEAxrI7Ws9Zc4Bt70N1As+U\\nlySjaEVZCMkqvHJ6TCuVZFfQoE0r0whdLdRLU2PsLFP+q7qaeZQqgBaNSKeVcDYR\\n9B+nY/jOmQoPewPVsp/vQTCnE/R81spu0mp0YI6cIheT1Z9zAy322svcc43JaWB7\\nmEbeqyLOP4Z4qSOcmghZBSECgYACvR9Xs0DGn+wCsW4vze/2ei77MD4OQvepPIFX\\ndFZtlBy5ADcgE9z0cuVB6CiL8DbdK5kwY9pGNr8HUCI03iHkW6Zs+0L0YmihfEVe\\nPG19PSzK9CaDdhD9KFZSbLyVFmWfxOt50H7YRTTiPMgjyFpfi5j2q348yVT0tEQS\\nfhRqaQKBgAcWPokmJ7EbYQGeMbS7HC8eWO/RyamlnSffdCdSc7ue3zdVJxpAkQ8W\\nqu80pEIF6raIQfAf8MXiiZ7auFOSnHQTXUbhCpvDLKi0Mwq3G8Pl07l+2s6dQG6T\\nlv6XTQaMyf6n1yjzL+fzDrH3qXMxHMO/b13EePXpDMpY7HQpoLDi\\n-----END RSA PRIVATE KEY-----\\n"
}
When the request succeeds, and the certificate is checked to be valid, the information needed for the next step is in the response.
					{
  "certificateId": "3822ff90-ea29-44df-9e55-21300bb9419b",
  "status": "EXPIRED",
  "hosts": [
    "example.com",
    "www.example.com"
  ],
  "expiresOn": "2021-01-01T05:20:00Z",
  "uploadedOn": "2016-01-01T05:20:00Z",
  "issuer": "DigiCert",
  "signature": "SHA256WithRSA",
  "customHostnameVerificationTXTName": "_example.com",
  "customHostnameVerificationTXTValue": "4c9c3f4f-2e91-4c5d-a902-f12f9c285b9e",
  "customHostnameId": "354a48f6-3d98-4c15-9312-211984ee8518",
  "customHostname": "cc-merchant.com",
  "customHostnameStatus": "PENDING"
}
Encoding the certificate and key
Since JSON is used, the body of our request needs to be safe to use in that manner.
Certificates and Private Keys tend to have several new line characters incompatible with JSON.
These need to be “escaped”. Luckily, many online tools can help you with this chore.
Step 7: Validate ownership of the domain
For this step, we need the person who manages the DNS records of the domain in question. To prove we own this domain to Cloudflare, a txt record must be added to its configuration.
The data of this TXT record was in the response of the previous step:
					{
  ...
  "customHostnameVerificationTXTName": "_example.com",
  "customHostnameVerificationTXTValue": "4c9c3f4f-2e91-4c5d-a902-f12f9c285b9e",
  ...
}
Once this record is added, the “Get certificates” endpoint is available to track the status. As soon as it changes to “ACTIVE”, you can go to the next step!
Step 8: Update the DNS records
The final step is to set the CNAME record in the DNS for the domain.
This is the combination of “commcloud.<zone_name>”.
The “zone_name” was retrieved in step 4 when the zone was created. It is always possible to do the “Get zones info” API call to get this information.
An example:
commcloud.stg-zzzz-cc-merchant-com.cc-ecdn.net
Step 9: Business Manager (Optional)
If you make use of vanity domains in the business manager, you will have to contact Support in order to manage this “zone” through the API.
Post-migration tasks validate your eCDN traffic flow and setup. To complete the post-migration process, coordinate with Commerce Cloud Engineering.Commerce Cloud Engineering creates and activates a staging Business Manager zone to handle your Business Manager traffic that goes through only your Business Manager host name, for example, staging-<realm>-<customer>.demandware.net. Business Manager doesn’t have an eCDN management page for staging instances.
Commerce Cloud Engineering services include the demandware.net lockdown protections that protect your production and development instances.
Post-migration tasks:
1. Revert to the *.demandware.net certificate at the origin: This step applies to custom certificates installed to the POD for the staging instance. Commerce Cloud Engineering validates that traffic is flowing through eCDN for the configured host names. After validation, the certificate at the origin level is reverted back to the standard *.demandware.net certificate. The Salesforce Commerce API (SCAPI) can then connect to your staging instance.
2. Create and activate a staging Business Manager zone: Commerce Cloud Engineering creates and activates the Business Manager zone for your implementation.
If you use the self-service steps to create an eCDN zone and certificate, contact SFCC Support. They contact Commerce Cloud Engineering to create and activate a staging Business Manager zone.
If you implement an existing custom certificate for your staging instance, Commerce Cloud Engineering creates and activates the staging Business Manager zone without a GUS request. You can request to opt out of this component.Infocenter (04/05/2023)
All done!
After all of these steps are complete, the domain can be used to reach the staging environment with a valid certificate!


