In this article, we will discuss the createOrders API used to create orders in the Commerce Cloud platform. The createOrders API is designed to create a fully calculated, paid, or authorised order on the fly in the Commerce Cloud platform. But how does it work?
When to use the createOrders API
With this API, creating an order is a breeze as it eliminates the need to go through the various steps required to create a basket, including authorisation, guest information, managing addresses, payment, and inventory management.
One of the most common scenarios where this API comes in handy is selling on social channels and offering in-app purchases. The API enables you to send the entire order to be shipped without going through the usual steps. A third-party provider managing recurring orders can use this API to streamline their processes.
The potential use cases for this API are numerous and diverse, and it’s a valuable tool for developers and architects!
Things to keep in mind
If you plan to use this API, know it relies on the origin system that creates the order. This means you must ensure that all the necessary checks and verifications are done in the third-party system before transferring the order into B2C Commerce Cloud.
So, what kind of checks are we talking about? Well, a few things need to be verified before the order can be processed. For example, the address to which the order is being shipped must be validated and corrected if there are any errors. You wouldn’t want the package to end up at the wrong address.
Another thing that needs to be verified is the payment information. This is important to ensure the transaction is legitimate and the customer can pay for the order. Nobody wants to deal with fraudulent transactions; verifying the payment information is one way to prevent that.
Some technical things must be handled – For instance, the order price needs to be calculated accurately. And, if there’s limited inventory for the item being ordered, the stock must be reserved and released promptly.
These checks and verifications are essential to ensure that the order is processed correctly and that the customer is satisfied with their purchase. Selling products on a third-party channel is one thing, but you don’t want them to get stuck in the process!
Implementation
Getting a SLAS API key
We can’t have just anyone pushing orders in our system, do we? So the first step is to create an API key in SLAS!
In this case, we will be creating a private client. Using a visual UI to make things easier is possible, which I explain in a different post.
There are a few key differences:
- Which App Type will be used?: “BFF or Web App”.
Choosing this option will create a “private” client.
- Do you want the default shopper scopes?: Unchecked
- Enter custom shopper scopes: sfcc.orders.rw sfcc.ts_ext_on_behalf_of
Authenticating
Before we can start pushing in orders for anonymous or registered users, we need to get a Trusted System Access Token. With this token, we will allow our third-party system to act on behalf of a guest or registered user without knowing their credentials.
URL: https://{shortCode}.api.commercecloud.salesforce.com/shopper/auth/v1/organizations/{organizationId}/oauth2/trusted-system/token
Authorisation: Basic Authentication
Authorisation Format: {SLAS Client}:{SLAS Secret}
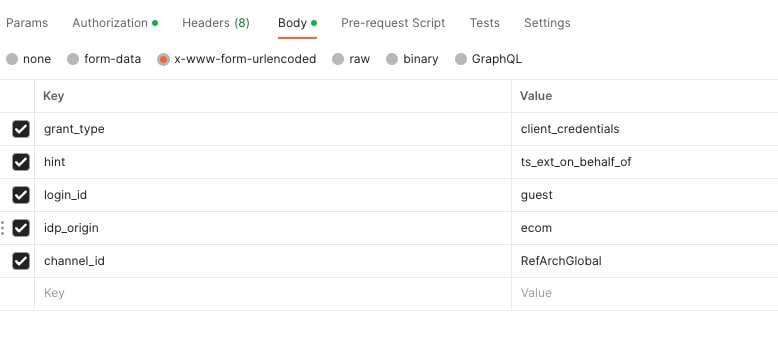
Body: application/x-www-form-urlencoded
					// guest
grant_type:client_credentials
hint:ts_ext_on_behalf_of
login_id:guest
idp_origin:ecom
channel_id:RefArchGlobal
Within this body, we are authenticating a guest customer via “ecom” (B2C Commerce Cloud) for our site “RefArchGlobal“.

When submitting your request, the following response should pop out!
					{
    "access_token": "JWT TOKEN",
    "id_token": "",
    "refresh_token": "A-dhgTIz-WCGVDrt5OwVb4lWD3f2-KmkCAI7e4",
    "expires_in": 1800,
    "token_type": "BEARER",
    "usid": "0884d762-9f45-46e2-812a-2f9cd1d89",
    "customer_id": "abkbE2leo1lHgRmuwYlqlKsW",
    "enc_user_id": "",
    "idp_access_token": null
}
And with our access_token we can continue our journey and push an order into Commerce Cloud!
Creating an order
Almost there! Now we have everything to start creating our order (except the order itself). We need to do a second API call using the bearer token we generated in the previous step, linking us to that specific customer.
URL: https://{shortCode}.api.commercecloud.salesforce.com/checkout/orders/v1/organizations/{organizationId}/orders
Authorisation: Bearer token
Body:
					{
  "billingAddress": {
    "address1": "43 Main Rd.",
    "city": "Burlington",
    "firstName": "Jane",
    "lastName": "Doe"
  },
  "channelType": "instagramcommerce",
  "currency": "USD",
  "orderNo": "0000019373",
  "orderTotal": 66.91,
  "taxTotal": 12.39,
  "paymentInstruments": [
    {
      "paymentMethodId": "PAYPAL",
      "paymentTransaction": {
        "amount": 66.91,
        "transactionId": "abc13384ajsgdk1"
      }
    }
  ],
  "productItems": [
    {
      "basePrice": 30.98,
      "grossPrice": 61.96,
      "netPrice": 49.57,
      "productId": "black-shoe_29347-38",
      "productName": "special edition shoe women 38",
      "quantity": 2,
      "shipmentId": "shipment1",
      "tax": 12.39
    }
  ],
  "shipments": [
    {
      "shipmentId": "shipment1",
      "shippingAddress": {
        "address1": "43 Main Rd.",
        "city": "Burlington",
        "firstName": "Jane",
        "lastName": "Doe"
      },
      "shippingMethod": "EXPRESS",
      "shippingTotal": 4.95,
      "taxTotal": 0
    }
  ]
}
After submitting this request we should get an empty response with status 201 (CREATED).
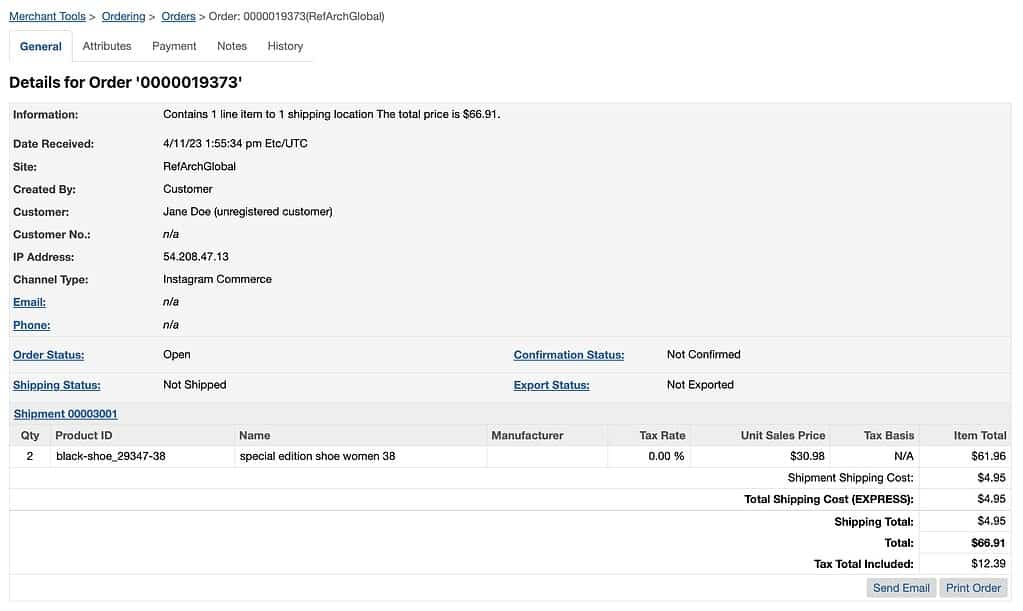
And with that, our order is visible in the Business Manager!
GMV
The method outlined above impacts the GMV, which can lead to higher licensing costs. But don’t worry: that’s where negotiation with Salesforce comes in.


