Salesforce B2C Commerce Cloud offers a robust, flexible Jobs framework vital for performing scheduled or on-demand tasks for e-commerce operations. One of the critical capabilities of this framework is the ability to define custom job steps, which can be either task-oriented or chunk-oriented.
In this article, I’ll focus specifically on chunk-oriented job steps and how you can master them to enhance your platform’s performance.
Understanding Chunk-Oriented Job Steps
Chunk-oriented job steps are designed to handle lists of items by processing them in manageable segments called chunks. This technique is handy for operations that need to work with large sets of data, like processing orders, exporting data, or bulk updates.
Each chunk-oriented job step involves reading, processing, and writing items. If the list contains more items than can be processed in a single chunk, the system starts a new chunk, and the cycle repeats until all items have been processed.
Essential Components of a Chunk-Oriented Job Step
When developing a chunk-oriented job step, you need to implement several functions:
read-function: Retrieves one item or null if no more items are left to process.- Process function: Applies business logic to each item, transforming it as necessary.
write-function: Writes the processed items, typically to a file or database.
There are optional functions you can implement for further control:
total-count-function: Returns the total number of items available for processing. This can improve monitoring and progress feedback.before-step-function: Executes logic before all chunks are processed.before-chunk-function: Runs logic before each chunk is processed.after-chunk-function: Invoked after each chunk is successfully processed.after-step-function: Executes after all chunks have been processed.
An example
Salesforce provides a visualisation example in their documentation: https://developer.salesforce.com/docs/commerce/b2c-commerce/guide/b2c-custom-job-steps.html#chunk-oriented-script-module.
Creating a Chunk-Oriented Script Module
We will start with the script. If you need an example for steptypes.json, click here!
Importing what you need
Before writing our chunk-oriented script module, let’s ensure we have the required modules imported:
					'use strict';

var CustomerMgr = require('dw/customer/CustomerMgr');
var Transaction = require('dw/system/Transaction');
var ArrayList = require('dw/util/ArrayList');
read-function
This function would retrieve the next batch of customer profiles to update.
					// Mockup read function - replace with actual logic to retrieve customers
exports.read = function(parameters, stepExecution) {
    // This function needs to return a single customer or null if no more customers
    // For demonstration purposes, let's say we have a static array of customer IDs
    var customerIDs = new ArrayList(['customer1', 'customer2', 'customer3']); // Replace with real logic
    var currentCustomerID = customerIDs.iterator();
    var customers = [];

    while(currentCustomerID.hasNext()) {
        customers.push(
            CustomerMgr.getCustomerByCustomerNumber(
                currentCustomerID.next()
            )
        );

    }

    return customers;
};
process-function
Here we would perform the business logic to update the custom attribute:
					exports.process = function(customer, parameters, stepExecution) {
    // Update the 'myBoolean' custom attribute to a new value
    Transaction.wrap(function() {
        customer.custom.myBoolean = true; // set this to the desired value
    });

    return customer;
};
write-function
As the customer profile is updated in the process step within a transaction, the write function may not be necessary unless you log the updates or perform additional actions.
If required, it could look like:
					// Mockup write function - replace with actual logic if writing out
exports.write = function(updatedCustomers, parameters, stepExecution) {
    // Optional: Log the update or perform other write operations
    var Logger = require('dw/system/Logger');

    updatedCustomers.toArray().forEach(function(customer) {
        // For example, log each customer's update status
       Logger.debug('Updated customer: {0} with myBoolean set to: {1}',
            customer.getProfile().getCustomerNo(),
            customer.getProfile().custom.myBoolean);
    });
};
Putting it all together
					'use strict';

var CustomerMgr = require('dw/customer/CustomerMgr');
var Transaction = require('dw/system/Transaction');
var ArrayList = require('dw/util/ArrayList');

// Mockup read function - replace with actual logic to retrieve customers
exports.read = function(parameters, stepExecution) {
    // This function needs to return a single customer or null if no more customers
    // For demonstration purposes, let's say we have a static array of customer IDs
    var customerIDs = new ArrayList(['customer1', 'customer2', 'customer3']); // Replace with real logic
    var currentCustomerID = customerIDs.iterator();

    return function() {
        if (currentCustomerID.hasNext()) {
            return CustomerMgr.getCustomerByCustomerNumber(currentCustomerID.next());
        }
        return null;
    };
}();

// Mockup process function - replace with actual logic for customer update
exports.process = function(customer, parameters, stepExecution) {
    // Perform the update of 'myBoolean' custom attribute
    Transaction.wrap(function() {
        customer.getProfile().custom.myBoolean = true; // Sets 'myBoolean' to true
    });

    // Return the customer for any further processing needed in write function
    return customer;
};

// Mockup write function - replace with actual logic if writing out
exports.write = function(updatedCustomers, parameters, stepExecution) {
    // Optional: Log the update or perform other write operations
    var Logger = require('dw/system/Logger');

    updatedCustomers.toArray().forEach(function(customer) {
        // For example, log each customer's update status
        Logger.debug('Updated customer: {0} with myBoolean set to: {1}',
            customer.getProfile().getCustomerNo(),
            customer.getProfile().custom.myBoolean);
    });
};

// Optional: add additional functions if necessary, such as beforeStep, afterStep...

// Define the beforeStep function to initialize any resources before processing
exports.beforeStep = function(parameters, stepExecution) {
    // Initialization logic goes here
};

// Define the afterStep function to clean up resources after processing
exports.afterStep = function(success, parameters, stepExecution) {
    // Clean up logic goes here
};
Adding the Chunk Size and Configuration
Finally, don’t forget to define the custom job step in your steptypes.json, including specifying the chunk size and the path to your custom module:
					{
  "step-types": {
    "chunk-script-module-step": [
      {
        "@type-id": "custom.MyCustomChunkScriptModuleStep",
        "@supports-parallel-execution": false,
        "@supports-site-context": true,
        "@supports-organization-context": false,
        "description": "My custom chunk script step type",
        "module": "my_cartridge/cartridge/scripts/steps/myChunkModule.js",
        "read-function": "read",
        "process-function": "process",
        "write-function": "write",
        "chunk-size": 10,
        "transactional": true,
        "parameters": {
          "parameter": [
            {
              "@name": "MyParameter",
              "@type": "boolean",
              "@required": false,
              "description": "An optional boolean parameter."
            }
            // additional parameters...
          ]
        },
        "status-codes": {
          "status": [
            {
              "@code": "ERROR",
              "description": "Used when the step failed with an error."
            },
            {
              "@code": "OK",
              "description": "Used when the step finished successfully."
            }
            // additional status codes...
          ]
        }
      }
    ]
  }
}
Remember that the process function wraps the update code within a transaction using Transaction.wrap(). This ensures the integrity of your data update operation.
Do you need to do my updates one by one? Of course not. The size of your commit is all up to you! Keep reading to get some insights into why the way you handle transactions is essential! Maybe that optional “after-chunk-function” can help us there 😊.
Now you have a chunk-oriented job step to update the custom attribute myBoolean for a list of customers. This job step can be configured and run via the Business Manager in Salesforce B2C Commerce Cloud.
Chunk Size?
The “Chunk Size” option refers to the number of data items processed in each chunk (part of the total). The chunk size parameter is crucial in optimising transaction performance and ensuring efficient handling of large datasets.
The ideal chunk size for a script module depends on various factors, such as:
- The processing logic’s complexity: Depending on the operations that must be done and other database objects that need to be fetched, we need to remember memory management. For example, choosing a smaller chunk size will allow the system to clean up more efficiently after processing each chunk.
- The data set’s size & the risk of optimistic locking: When working with a “high risk” object such as profiles that can be modified at any time, setting a smaller chunk size and committing these immediately to the database will reduce the risk of running into Optimistic Concurrency Exceptions!
Transactional?
When setting a job to transactional, the job step executes as a single and potentially substantial transaction. This means that if there are any errors during the execution of the job step, the entire transaction will be rolled back (because of the Optimistic Concurrency mentioned in the previous section).
This can be dangerous, primarily if the job processes a large amount of data. If the transaction is rolled back, all the data processed until that point will be lost. This can result in data consistency, integrity, and even performance issues.
Keeping the default setting false is recommended to avoid this negative impact and allow for more granular transaction control. Instead, implement transaction handling within the job step using the “dw.system.Transaction” API. This API provides more transaction handling control and better error handling and recovery mechanisms.
Using a Chunk-Oriented Script Module in Jobs
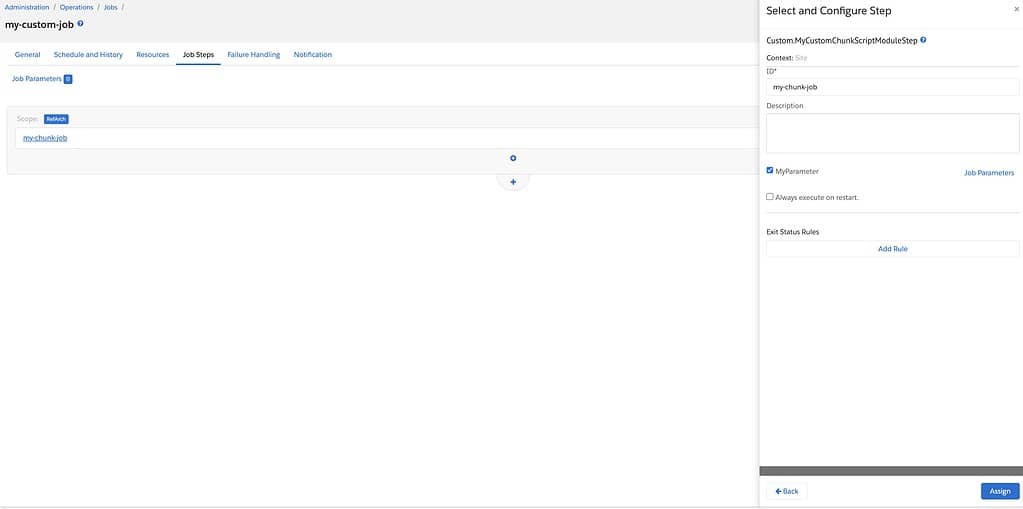
Once your script module and steptypes.json are ready, upload them as part of your custom cartridge. You can then create a job in Business Manager with your custom chunk-oriented step to start processing data in chunks.
Advantages of "total-count"
If you decide to implement the “total-count-function“, you can conveniently keep track of your job’s progress in the Business Manager. This feature is handy if you have a large dataset and need to estimate when the job will be completed or if you want to know how far along the job has progressed on the list.


Best Practices and Performance
When working with chunk-oriented job steps, keep the following best practices in mind for optimal performance:
- Focus on memory management: Only keep necessary items in memory and promptly discard references to processed items.
- Stream data when appropriate: Avoid accumulating large amounts of data in memory.
- Utilise transactions strategically: Wrap operations in transactions only when necessary to avoid locking resources for extended periods.
- Monitor and handle errors: Ensure your job can gracefully handle and recover from errors.


